

#Week2 Challenge Overview:
->Design a 3-tier architecture in AWS.
->Highly available, highly scalable, and fault-tolerant
Let's Start.....
The 3-Tier Architecture
As a popular implementation of client-server software design, the 3-tier architecture includes a presentation tier (web layer for the client), a logic tier (the application layer), and a data tier (containing a database layer).
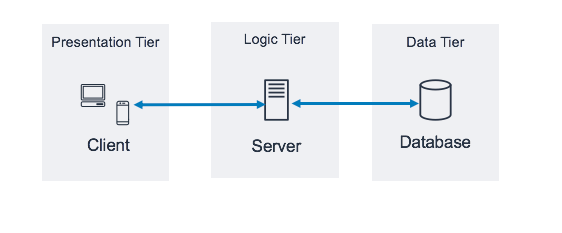
Think of it like a restaurant:
The restaurant that client can visit — Presentation Tier.
Orders being sent to the kitchen — Logic Tier
The kitchen processing the order and keep inventory in stock — Database Tier
Let's Begin towards the Our Application..
WEB TIER:
Step:1 Creating our VPC(Virtual Private Cloud)
For Creating the VPC go to console and search VPC and click on the VPC and Clicking on VPC click on create new VPC. then select VPC and more and give the name to your VPC.

Now, we will selecting the subnets for our project 2 public subnets for the Web tier and 4 private subnets for application tier and database tier. In this we will also select NAT gateway so be sure to select the NAT gateway because it comes with cost.

Now click on the Create VPC before this let's the preview of created VPC.

Now you can see success screen below:

Step:2 Creating Web Tier Launch Template..
For this navigate to the EC2 console and select the Launch Template and click on Create Launch Template.Now we will give name to our template, of course. This gives an identifier for the template we will attach to our auto scaling group we will be creating in the next step.

After this we want to select the Operating System and Instance type so I selected the Operating System as Amazon Linux and Instance type as t2micro that is free. After that we have to either create a key pair or select the Key pair previously created , So I am creating a new key pair for this, whenever we create any new Key pair it automatically downloaded.


In Network settings, we’re going to select “Create New Security Group”. This is where we will give access to the internet based on the configurations we select. To start we will name our security group and attach the VPC we just created in Step 1

Next, we will add our “Inbound Security Group Rules”. Setting up these configurations will give us the ability to view our site over the internet. For demonstration purposes I selected the “source type” as anywhere. It is best practice to not use this, as it gives anyone access. Now in “Advanced network configuration” we will want to enable “Auto-assign public IP”.


At last we have to edit some thing in the Advance Details, leaving everyting as default setting we will write code into User Data and select Launch Template.
#!/bin/bash
yum update -y
yum install -y httpd
systemctl start httpd
systemctl enable httpd

Step:3 Creating Auto Scaling Group:
Now, creating auto scaling group back to the EC2 and in left side you can see at last Auto Scaling Group click on that and select create auto scaling group to start we need to name the auto scaling group and attach template that we had created.his will attach the configurations that we created in the template to the instance(s) that will generate as a result.then click on next

Our next step will be attaching the VPC and the two subnets created earlier in Network settings.

Next, we will select “Attach New Load Balancer” and select “Application Load Balancer”. We will choose the “Internet Facing” option to allow us to access the internet. Under “Listeners and Routing” we will then select “Create a Target Group” and name it.


Now we are going to select our desired . In this same section we are able to choose our minimum and maximum capacity limits, So I am Selecting minimum 2 and the maximam 5. The next option we’re choosing is Target Scaling policies, this gives you the ability to resize your Auto Scaling group to meet changes in demand.

Leaving the other steps as default we will be brought to a summery page that shows all of our selections. Once we have reviewed this, we will selection “Create Auto Scaling Group. Once our ASG is created we will navigate back to the EC2 console and choose one of the instances and copy the public IP and paste it in a web browser of your choosing for testing your site. Don't be alarmed if the IP doesn't work immediately. It takes a second for the instance to run.

I am seeing this page that's conatining It's Work..
---------
Application Tier:
Step:1 Creating Application Launch Template.
Now our Web tier is completed and after completing web tier we will made the Application Tier let's start
In application tier is that where the data is processed. To start we are going to create the launch template for the Application tier.First part of this same as previous tier apart from renaming the template.🫡🫡
We will continue to use the standard Amazon Linux Operating System and Instance type as t2. micro.


Now in Network settings this is where things are going to change. We will start with name our security group for the Application tier and attaching the VPC previously created. In the “Inbound security group rules” section we want to limit access for security. That Application tier is known as the “logic” tier, so we would not want just anyone to have access to its workings. We want to give access to SSH/HTTP/ICMP-IPv4. Giving access to ICMP allows us to ping the App Tier from the Web Tier. In each of our rules, we are going to want to attach the security group we created previously, by selecting “custom” in the “source type”.

Now that we everything is set up, we will select “create launch template”.
Step:2 Create Auto Scaling Group
Same as web tier we will also create auto scaling group for Application tier.
By selecting EC2 in the left side in bottom you can see "Auto scaling group" click on that and select create auto scaling group after the name the group and select the template we have created for application tier.

In network settings, we are going to attach the VPC we created and attach two of the private subnets we previously created. In this step, it's a good idea to notate the AZs and subnets you are going to use to distinguish them from the subnets you will use in a future step.

We are now at attaching our load balancer for the application tier. Here we are going to select internal instead of internet facing for security.

Now capacity and group sizing we will keep the desired as 2, minimum as 2, and maximum as 2 the same as before. Once completed we will create our Application Tier Auto Scaling group. Next navigate to the EC2 console where you will see 4 running instances.
Step:3 Update the private routing table
Navigate to the VPC console and select Route Tables on the left side. You will see 8 subnets that are labeled by default from when we created the subnets earlier. Select one of the private subnets and navigate to Subnet association, select your other private subnet and save the association. Now in the “Explicit subnet association” for the subnet we selected you will two subnets shown.
-------------
Database Tier
Step:1 Creating a database subnet Group
We will start with navigating to the RDS console and select “Subnet Groups”. Now we are going to create our subnet group and of course we want to give our group a name and attach the VPC we have been working with.

Now we will start with associating our subnets to the AZs we are using. Be mindful not select the other two subnets that were used for the previous tier. If you need to reference back the subnets can be found in the VPC console. Once we have made our selections we will select “Create”.

We succesfully created the Subnet data group.

Step:2 Create MYSQL Databse
We have just created the subnets groups mow we will creating mysql database.For that Navigate to the Database and Select Create Database. Now, select Standard Database.This allows us to set all of our configuration options, including for availability, security, backups and maintenance. The engine we will use for this project will be MySQL.

Under the filter section we have the option to select Show a version that supports the multi-AZ Db cluster, this is helpful when one of your instances fails you have two others you can use as a backup. For this project we will not be choosing this selection.

Now in templates, we are going to want to choose Free Tier, which is used to develop new applications, test existing applications, or gain hands-on experience with Amazon RDS. Since we are in Free Tier the options in Availability and Durability are greyed out and we don't need them for what we are doing.

In the setting section we are going to want to name our DB Instance Identifier and input a password. Keep this password for future reference.

Under Instance Configurations we are going to choose our instance type (db. t.2 micro). The Burstable classes are chosen for us.

There are a lot of selections to choose from in the Connectivity section. To start we will choose Don't connect to EC2 compute resource because this is not internet facing.

Now we will select the VPC for the project and attach the subnet group for this DB we just created. We are going to select No for public access since this is for the company’s website.

Next, we will create a new security group for the data tier, where we are going to attach our availability zone.

In Database authentication, select Password Authentication. You will utilize the password you set up before. When this is complete select Create Database.
Step:3 Updating Inboundded Rules.
In the network section in Create Database we were not able to allow inbound rules, but we are going to want to allow access to MySQL. We want update that by navigating to Security Groups in the VPC console and select our data tier Security Group. Here we will see a rule already there (MYSQL/Aurora Port Range 3306).Delete that by default rule and add new rule and save it.

Step:4 Updating Data Route Table.
In Route Tables on the left side select one of the private subnets and navigate to Subnet association, select your other private subnet and save the association. Now in the Explicit subnet association you will see the two subnets shown.

Now that we see our route tables successfully associated, we have made it to the end of the data tier!
\==========
TESTING OUR CONNECTION
Navigating to the one of EC2 instances copy the Public IP and input that into a browser and test. We have a working website!
To Test our Private IP- SSH into our EC2 instance and ping our private IP. We’ve made it when we get the continuous pings, this is data passing through. To stop this process, you would enter Ctrl+C.
Thanks for the reading My new blog on Three tier architecture in aws
Happy Learning);;
Reference:-
https://aws.plainenglish.io/how-to-build-a-3-tier-architecture-in-aws-dcd637f23fe5