🌐 Mastering AWS Security: Day 05 — Understanding Security Groups and NACLs! 🔐
Introduction:
Hello, Cloud Explorers! 🛡️ Welcome to Day 05 of our 30 Days of DevOps adventure, where today we’re diving into the world of AWS Security. We’ll be talking about Security Groups and Network Access Control Lists (NACLs) — two powerful tools that help keep your AWS fortress safe.
Imagine your cloud as a castle, and Security Groups and NACLs as the guards at the gate. They make sure only the right stuff gets in and out, keeping your digital home secure. Today, we’re going to learn how to use these tools to make your AWS castle super strong! 💪🏰
Get ready for a simple guide on AWS security that goes beyond the basics! 🚀 We’ll talk about Security Groups, which decide who can come in, and NACLs, which control the flow of traffic. By the end, you’ll be able to make your AWS home safe and sound. 🌩️
So, Cloud Adventurers, let’s jump into the world of AWS Security on Day 05. Every rule, every block, and every permission is like making your castle walls even stronger. 🌐🔐 Are you excited to learn how to protect your AWS home? Let’s get started! 💻🛡️✨
Security Groups — The Gatekeepers:
Security Groups act like vigilant gatekeepers at the entrance of your AWS castle. They decide who gets to come in and who stays out. Think of them as a bouncer at a club, checking the guest list and allowing only authorized person or entities to enter. Security Groups are rule-based, allowing you to define what kind of traffic is permissible.
Creating a robust set of Security Groups involves understanding your application’s needs and crafting rules that align with those requirements. Whether it’s permitting specific IP addresses, enabling certain protocols, or restricting access to designated ports, Security Groups ensure your AWS castle doors are opened only to trusted entities.
NACLs — Traffic Directors:
Network Access Control Lists (NACLs) operate at a higher level, controlling the flow of traffic within your AWS domain. If Security Groups are the gatekeepers, NACLs are the traffic directors, orchestrating the movement of data throughout the castle. NACLs are stateless, meaning they evaluate each network packet independently, allowing for a more granular control over traffic.
Configuring NACLs involves setting rules based on IP addresses, protocols, and port ranges. By strategically placing these checkpoints within your AWS infrastructure, you gain an extra layer of defense against potential threats. It’s like having sentinels posted at various points, ensuring that every interaction within your AWS domain aligns with your security policies.
Empowering Your AWS Journey:
As we navigate through Day 05 of our DevOps adventure, it’s essential to recognize the pivotal role that Security Groups and NACLs play in fortifying your AWS fortress. The key to mastering AWS security lies in understanding the unique strengths of these tools and deploying them strategically to create a robust defense mechanism.
Best Practices for AWS Security:
Least Privilege Principle: Grant the minimum level of access necessary for your resources. Limit permissions to only what is required for each entity to perform its function.
Regular Audits and Updates: Periodically review and update your Security Groups and NACL configurations to adapt to evolving security needs.
Logging and Monitoring: Implement comprehensive logging and monitoring to keep a close eye on activities within your AWS environment. Set up alerts for suspicious or unauthorized access attempts.
Documentation is Key: Maintain detailed documentation of your Security Group and NACL configurations. This not only aids in troubleshooting but also ensures a smooth onboarding process for new team members.
For the better understanding let’s create the Project, this project is demonstrate by the
in the their AWS series (aws-zero-to-hero).
Project:

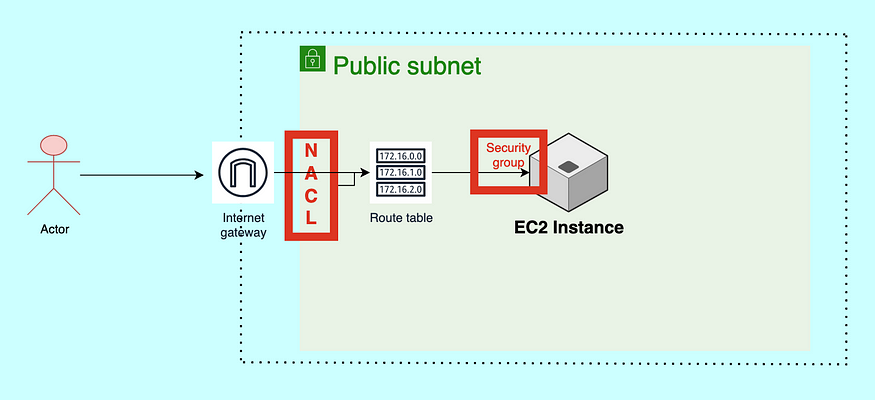
This is a diagram or flow of our today’s project, In this we will be understanding the VPC(Day:04) and Security Groups(Day:05) concepts.
Let’s Start:
Step:1
Go to the AWS Management Console.
Step:2
In the Search bar search for VPC

You will see this type of interface. Don’t be afraid by seeing this interface we will be talking about this.
Step:03
Click on the Create VPC

There is two option for creating the VPC one is you want to create only VPC and second is VPC and more
- Only VPC Option:
This option usually refers to creating a Virtual Private Cloud (VPC) in isolation. A VPC is a logically isolated section of the cloud where you can launch resources in a virtual network that you define. It allows you to control your network environment, including IP address ranges, subnets, route tables, and network gateways.
2. VPC and More Option:
This option implies that, in addition to creating a VPC, you can configure and deploy additional services or resources within that VPC at the time of creation. The “more” could include options like creating subnets, security groups, route tables, Internet Gateways, NAT Gateways, Elastic IPs, etc.
Click on the second option (VPC and more), when you click on the second option that shows you one preview of your VPC.

Like this one in this we can see that VPC by default create the 4 subnets 2 in public and 2 i private and they both are in different region. After that it also created the route table and at the last but not least it also created or attach one igw(Internet Gateway).
Step:04
Now you see their is option for the name tag you can click on auto generate or you manually give the name tag.
Step:05
Now there is ipv4 CIDR block:
What is CIDR block?
CIDR (Classless Inter-Domain Routing) block refers to a range of IP addresses that are specified using CIDR notation. CIDR notation is a compact representation of IP address ranges and their associated routing prefix.
In CIDR notation, an IP address is followed by a forward slash (“/”) and then a number representing the prefix length. The prefix length indicates the number of bits in the network portion of the address. For example, a CIDR block might look like this: 192.168.0.0/24.
Here’s a breakdown of the components:
- IP Address (e.g., 192.168.0.0): This is the base IP address of the CIDR block.
- Forward Slash (“/”): Separates the IP address from the prefix length.
- Prefix Length (e.g., 24): Represents the number of bits used for the network portion of the address. In the example
192.168.0.0/24, the first 24 bits are designated for the network, and the remaining 8 bits are for host addresses within that network.
For the demo purpose i am selecting the default option.

In this you can also adjust the availability zone according to your need.
now click on the create VPC
Congrats you created the VPC…

Step:06
Now according to our project we have create one ec2 instance and run a simple http server.
Let’s Goooo..
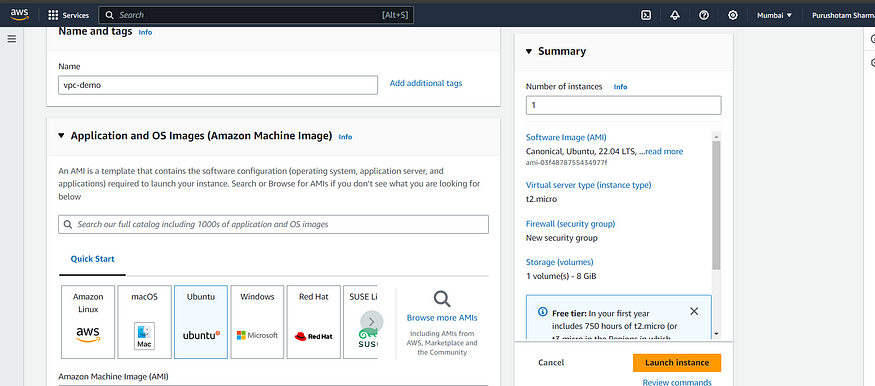
Go to the aws management console>Ec2 Service> Click on Launch Instance.
now we will play with the VPC.
- Name the server

Choose the AMI here I am selecting the ubuntu flavour.
Instance type: Free
Select the key pair
now we have to understand the main part of creating the EC2 instance.
In the network setting you have to choose or edit your vpc that you created before
Click on the Edit button

Select your vpc from dropdown
Then enable the auto assign public Ip.
Click on the Launch Instance.
Now we will connect to our Ec2 Instance and deploy one simple python application to play with the VPC.
Now update your server using
sudo apt-get update
now we will check that python3 is install or not.
So in my server it is install so we proceed to next step , if in your not install then install it and run this command
python3 -m http.server 8000
Here we starting a simple http server on the 8000 port.
now copy your Ip address and past in the other tab to access the server.

You can see the reloading only it not showing anything because we did not allow the last security group. See in the diagram there is one Security group before the Ec2 instance. So here we have to allow the port 8000 in the Security group.
Go to your instance > In the security option their is Security groups

Click on that Click on the Edit inbound rule and allow the 8000 port.

Click on the save and now access your server on the port 8000.
Now you will see this type of interface that you can access your application.

Now we will play with VPC… Are you excited…
Now go to your VPC and See the NACL.

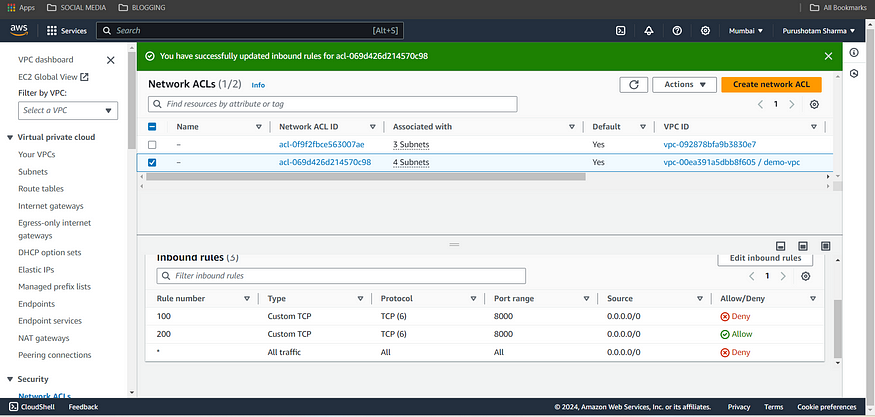
Here in the above image you can see that NACL is allowing all the traffic. Let’s here deny the port 8000
Click on the Edit Inbound rule
Delete this one and add

NACL work on the Roll number and it execute the query that comes first.
Let’s the save changes and access your server on the port 8000

You can see NACL is not allowing the port 8000 so we can not access the server on the port 8000.

Here in the above image you can see the any traffic coming from the 8000 port is Deny.
Our server is not accessing because the NACL security not allowing the port 8000 here we can allow or deny ports according our need or organization.
Now what if we allow the port 8000 in the 200 roll number

Let’s see any guess then comment …

Now also we can’t access to our server because the NACL work the roll number, like whatever the roll number comes first it executes that one.

It is allowing the port 8000 but not in the acceding order .
Now allow the roll number 100 and deny the 200 what happens…
Now we can access our server.

This is the concept of Security Group and NACL.
Hope you like this blog.
If you like this blog then comment so I can provide you much blogs on AWS and if you have any drought the comment it i will reply as soon as possible.
Exploring Further on GitHub:
For those eager to apply their newfound knowledge hands-on and dive deeper into AWS, we’ve created a dedicated GitHub repository. This repository serves as a practical companion to the concepts discussed in this blog.
GitHub Repository Link: Your AWS Learning Repository
In this repository, you’ll find additional resources, sample configurations, and exercises that reinforce the IAM basics we covered today. Whether you’re a beginner or an experienced AWS enthusiast, feel free to fork the repository and start experimenting in your own AWS environment.
How to Get Started:
- Fork the Repository:
- Click on the “Fork” button on the top right of the GitHub repository page. This action creates a copy of the repository in your GitHub account.
2. Clone the Repository:
- Clone the forked repository to your local machine using the following command:
git clone https://github.com/PurushotamSharma/30-Days-of-AWS-Adventure-
- Explore and Learn:
- Navigate through the repository, explore the provided resources, and follow along with the exercises. Experiment with IAM configurations and get hands-on experience.
2. Contribute and Share:
- If you come up with improvements, additional examples, or new exercises, feel free to contribute back to the repository by creating pull requests.
GitHub Profile: Your GitHub Profile
By combining theoretical knowledge with practical exercises from the GitHub repository, you’ll solidify your understanding of IAM in AWS.
Happy learning, and may your AWS journey be both educational and rewarding!
